Friday 23 March 2012

Cleaning out the chicken coop

Oh the joys of cleaning up chicken poop after a long winter of collecting the "chicken gold".  We wait for a warm day and then start shoveling!  The hay/poop/chicken gold goes out to a manure pile in the pen outside and then we compost and wait for the rain and the sun to do it's work and give us some nice fertilizer in a few years.

Girls hauling the shop vac to the barn

Yes, I'm using the shop vac to get the cobwebs
 Did you know a crow bar works really well to scrape into the corners of the nests?  After they were cleaned out we used some Detol (spelling?) disinfectant as we didn't have anything else to use.  Then we let them sit for a few days to air out.
 While dear hubby was constructing some new chicken pens, he remembered some cool tools he had in the shop.
Neatest little tool ~ it uses a 22 shell to power the nail into concrete.
 The girls had fun using the hammer to "bang" the top of the tool so the 22 shell's gun powder would power the nail through the wood and into the concrete.  Tweety Bird had to check out what all the noise was about...
 ain't he a sweet heart?  Such a friendly little rooster!
Mei had some difficulty hammering her nail, but it was great fun to watch...girls like to help their Dad build things and it's a great learning time. 


Thursday 22 March 2012

Doll Birthday Party Favors

My daughter's love their American Girl dolls ~ yes, we are Canadian, but they love the history in the books and how the characters relate to them.  So, often we have Birthday parties with their dolls.  This time I made some little apron's for their dolls and the "Mommy" got to decorate them for the doll.

 Oh wait, that one is "Lammie" who our eldest has had since she was an itsy bitsy baby.
Simple rectangle, with a pleat and waistband sewn on

Lammie and Kit model their new aprons

 Girls decorating using fabric markers and pens

Julie and Julie with their Aprons

Can't leave out the cow either

The birthday girl models her new purple apron
 Why is it that when you are selling items (like apron's) your own children have to wait and wait for theirs?  Well, maybe it has to do with the fact that it's hard to hide what you are doing!  Managed to surprise our daughter with this one as her b'day gift from us... glad she approved!
Back straps were a little long, so I tied a little knot in them for now.  

Monday 19 March 2012

3 Lil' Dotty Aprons all in a row ...

Two more darling "Lil' Dotty" red aprons were added today for the little girls aprons. That makes 3 in total and now my own 8 year old wants to keep one, so I said I'll make her one using some of the leftover materials from these.

I'm noticing my wood pile is getting a little lower than when I started sewing this fall !


~ I had my 8 year daughter try this on and she did NOT want to take it off ~
 Tie adjustment for the neck to make sure it fits perfectly ~ Approx. Size 6-9 yrs ~ $20
Approx. Size 5-7 ~ $20


Shown together to show slight sizing difference
These "Lil' Dotty"  Aprons are available for purchase.  I'm loving the red tones!


Sunday 18 March 2012

Banana Oatmeal Surprise Muffins

Banana Oatmeal Muffins with a Surprise filling!

Banana Oatmeal Muffins

1 1/2 cups Flour
1 cup Rolled Oats
1/2 cup White Sugar ( I use a little less, or brown sugar)
2 tsp Baking Powder
1 tsp Baking Soda
1/2 tsp Salt

2 Eggs
1/4 cup Cooking Oil
1/4 cup Milk
1 cup Mashed Ripe Bananas

Stir dry ingredients together, make a well in the middle.

Beat wet ingredients together.

Pour wet into dry and mix loosely, no dry parts.  

I put 1 small scoop of batter into my greased muffin tins.  Then added 1 tsp of Strawberry/Rhubarb Jam.  Then added more batter on top.

Bake 375 for 20 minutes until brown on top and cooked through.  

THRIFTY NOTE:  Banana's are the cheapest fruit around here, this uses them up.  Oats makes the muffins pack more nutrition and fill you up more.  Putting jam in the middle is a great way to use up little bits left over in jars in the fridge.  Also gives more sweetness, so you can use less sugar.


Stay tuned to see how my Gluten Free version will turn out!

Homemade Perogy Recipe


Kate wanted homemade perogies for her birthday party celebration...so we got a rollin' and pinchin'!


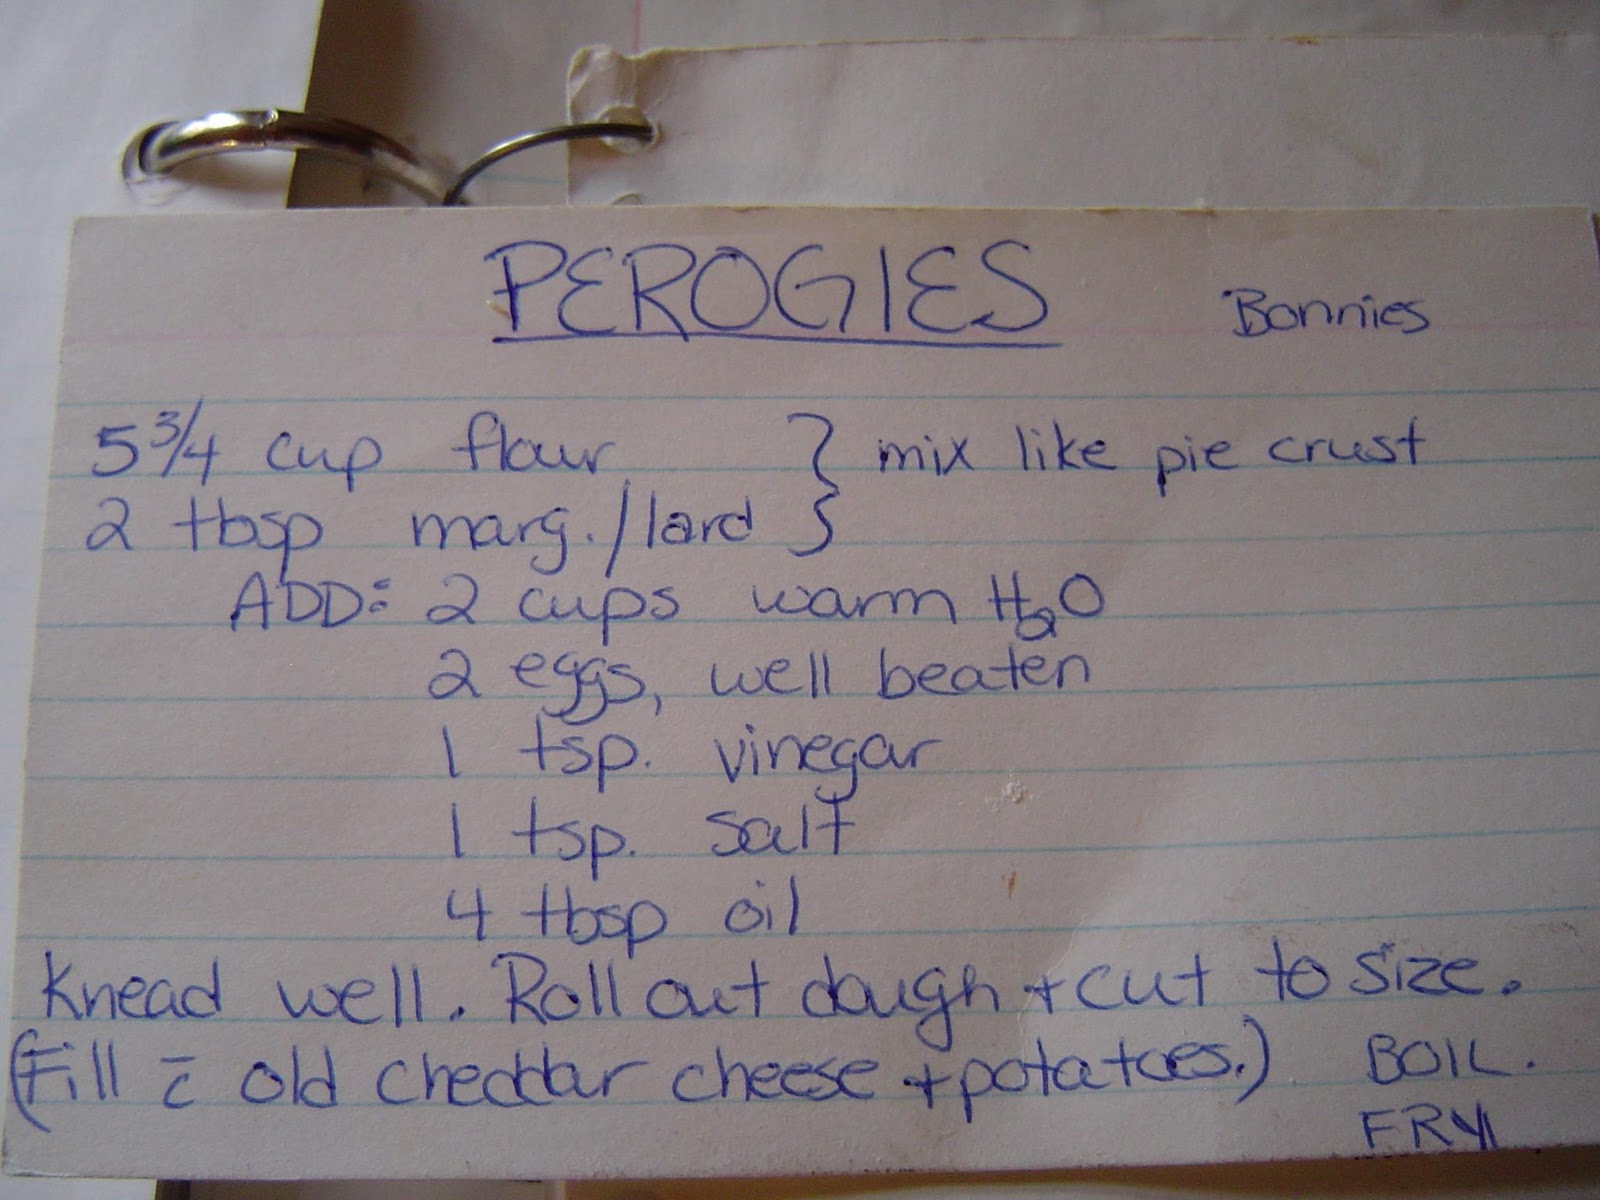
Start with a good dough recipe.  We looked at many and settled on this one.  I have since found another recipe that is very simple as well, but he said it's a bit of a secret :)

I precooked all the potatoes and made my filling ahead of time.  It should be cold so it doesn't start cooking the dough, etc.  I also made cottage cheese filling with 1 tub dry cottage cheese, 1 tub wet 2 % cottage cheese, 2 scoops cooked potatoes, 3 egg yolks and 1 tsp salt.  Worked well.  Cottage cheese are the hardest to get to stick together and not pop when boiled.  
The best is using dry cottage cheese with a little salt,  but it is so expensive.
Try putting homemade sauerkraut in some or try fruit fillings too... so many choices!

A bosch makes the dough work so easy peasy

Nana helps roll the first ones, being fancy with making them in actual circles.  Roll thin or you'll end up with very chubby and tough perogies.

Let children make weird baby perogies and giggle giggle

Others take this job very seriously and perfect the art.  Place a little ball of your filling inside the circle, fold over and start pinching.  Various sounds are optional...like blup blup blup


Little pre-shaped balls of mashed potatoes, medium cheddar cheese and a little salt.

 Making the little balls to fill the perogies

Boiling the first dozen, just to see if they are edible and stay together.  Most recipes say to boil for 5-10 minutes.  I ended up doing 7 minutes.  We love them fried up the next day as well.

Yup, they are yummy and disappear too quickly!


Another option is to just cut the dough into squares.  Then there is no waste and no "re-rolling" the dough as it can get tough.  The other option is to use the left over scraps as noodles. 
 Not a bad option at all we say! 

If you do the square, they look square instead of the 1/2 circle.
We froze them on racks and sheets and then put them in freezer bags later.  
YUM YUM!

Friday 16 March 2012

Started our broody hens setting on eggs

We had 1 large pen divided into 2 by a little chicken door so all our chickens and roosters were partying and mixin' it up.  Well, now we are heading into the time of year when the sun shines warmer and the snow will melt and little chicks should be hatched!  So we had to divide up the pens into 5 pens ~ 1 for each rooster and his lady-types.


 This tiny "broody" pen was made to be permanent in the barn, so it got a tiny roost and Gregg made a little 2 apartment nest for it.  It is toasty and cozy and now houses the Roo Tweety Bird and his Lady Licorice.
The ceiling was open to the loft, so we jammed some hay down and blocked the wind.
We found them like this in the morning
This was taken before the nest was put in
 This is the new self feeder my hubby built to fit along the right hand side of that room.  It is slender and fits perfectly.  I think we shall give it a little paint at some point for cute factor.
Feeder bottom
That little pen will be handy for when we have hens and chicks or any chickens that need separating.
The other side of the barn had 1 large pen that we divided into 2 temporary homes
All our pens are on timers for the light bulbs ~ set for 16 hours of "light" for best egg laying production.  Right now the heat lamps are on constantly and we are looking for some guards to put around them and also some shields to reflect the heat down.
1 smaller pen and 1 larger pen
We use hay as bedding as we don't have any sawdust available...they like to scratch in it and will eat it too.  The hay loft above was full of square bales this fall and we sure noticed a difference in how warm the chickens were.  The heat stayed down better and when you hit -40C, you need all the help you can get!
 The new pen, they love it!  We love to watch them eat and scratch in the hay.  They say if chickens got 1 - 3 blades of grass a day there would be no Avian flu... interesting!

The smaller pen for the Brahma Roo and 8 ISA Brown hens
Once the snow melts in their outside pen, they will get to go outside again. Right now they just look at me like I'm crazy when I suggest they go out .... it's warming up to 3C now, so soon the snow will be muck!
Louie, the Jersey Giant and his ISA Brown and Buff Orpington/ISA cross hens
 Louie is so gentle that he wouldn't stand up to Mr. Bean, but boy, put him with his own ladies and no competition... he made up for lost time! 
 "Trudy" a Buff Orpington/ISA Brown that we hatched ourselves 11 months ago gets 10 eggs to sit on.
"Crystal" our Silkie gets 5 tiny eggs to sit on


 They tucked their little baby eggs in and haven't left the nest so far.  We are praying hard that they stay put and we'll hatch out around Easter weekend.  The eggs will be cross breed chicks, but we don't really care right now.  They were so broody, we thought they deserved a chance at it!
These 3 are in the broody pen as well, but they don't bother the brooders


Jersey Giant with ISA Browns and our Buff Orpington/ISA Brown hens

Silkie setting in the same pen as the Cochin's
Leghorns and Americauna chickens together
 They get the other pen and when the ice melts I'll open their door so they can go outside too.


 I shared this on ~ Homestead Revival