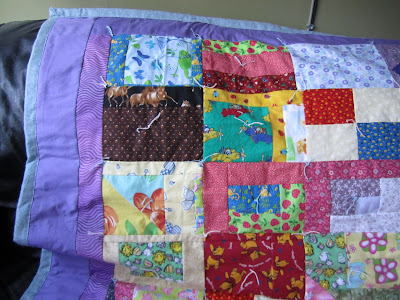
Well, the long wait is over since this beginning post for Mei's special Memory Quilt.
The rush was on, as she wanted it done for her birthday in September and also wanted me to display it at the local Fall Fair. They displayed it upside down...but hey, maybe some people were inspired to use their children's old clothes the same way.
We used Warm N Natural Cotton fill. It is in one big sheet and doesn't require so much sewing to hold it together. Perfect for tying. It's also a little more God-made and not man-made :)
NOTE: Don't use clear tape to tape your backing to your floor. I ran out of masking tape and thought it wouldn't be a big deal...I have tried 4 different things to get the goopy sticky mess off my floor ~ YUCK!
We tied the quilt with some yarn and now that I have received my walking foot for my old Singer sewing machine, we'll draw some designs around the purple edging and I'll sew that. It will help it stay together...so this will have to be continued yet again!
The idea with a quilt like this to use up scraps of their favorite materials, clothing, etc they had as babies. Due to that, no pieces are really the same and it lets the child use their imagination as to where they like to place the pieces. Just sew them in blocks that are the same dimensions and go for it!
The rush was on, as she wanted it done for her birthday in September and also wanted me to display it at the local Fall Fair. They displayed it upside down...but hey, maybe some people were inspired to use their children's old clothes the same way.
 |
| Mei's favorite square ~ she says it looks like a butterfly. |
 |
| First time doing Mitered Corners. Found a tutorial on YouTube. |
 |
| Flannel backing lying right side down. Wrong side up. Getting cotton fill ready. |
 |
| Lying the bottom right side down. Then cotton fill. Then quilt top. This is called a "sandwich". |
 |
| Lots of pins to hold in place. The cotton fill should be a little wider than the quilt top |
 |
| It helps on a larger quilt to fold it and unfold as you tie |
We tied the quilt with some yarn and now that I have received my walking foot for my old Singer sewing machine, we'll draw some designs around the purple edging and I'll sew that. It will help it stay together...so this will have to be continued yet again!
 |
| Finishing the tying. |
The idea with a quilt like this to use up scraps of their favorite materials, clothing, etc they had as babies. Due to that, no pieces are really the same and it lets the child use their imagination as to where they like to place the pieces. Just sew them in blocks that are the same dimensions and go for it!
 |
| Nearly finished product... |
 |
| Showing the flannel backing and quilt top |
 |
| Happy Child! Mission accomplished! |
 |
| My grad dress, clothes from Aunts and Uncles. Baby clothes, her favorite pants pocket... Linked on Above Rubies |


No comments:
Post a Comment
I enjoy your comments ~ thank you!